Facebook Pixel And Conversion API
Current version: 1.1.6
One guide for Meta / Facebook Pixel on CS-Cart:
- SonoTrix — Facebook Pixel And conversion API (recommended) — browser Pixel + Conversions API, test mode, multi-storefront, click-ID (
fbc) and catalog-friendly product IDs - CS-Cart built-in Facebook Pixel — browser-only Pixel ID (legacy / basic)
Do not run both add-ons with the same Pixel ID. If you use the SonoTrix add-on, disable the built-in CS-Cart Facebook Pixel add-on.
What you need from Meta
| Need | SonoTrix add-on | Built-in CS-Cart add-on |
|---|---|---|
| Pixel / Dataset ID | Required | Required |
| Conversions API Access Token | Required for server events | Not used |
| Test Event Code | Optional (testing) | Not used |
Part A — Meta (Facebook) setup
Step 1: Open Events Manager and find your Pixel ID
- Sign in to Meta Business Suite / Events Manager.
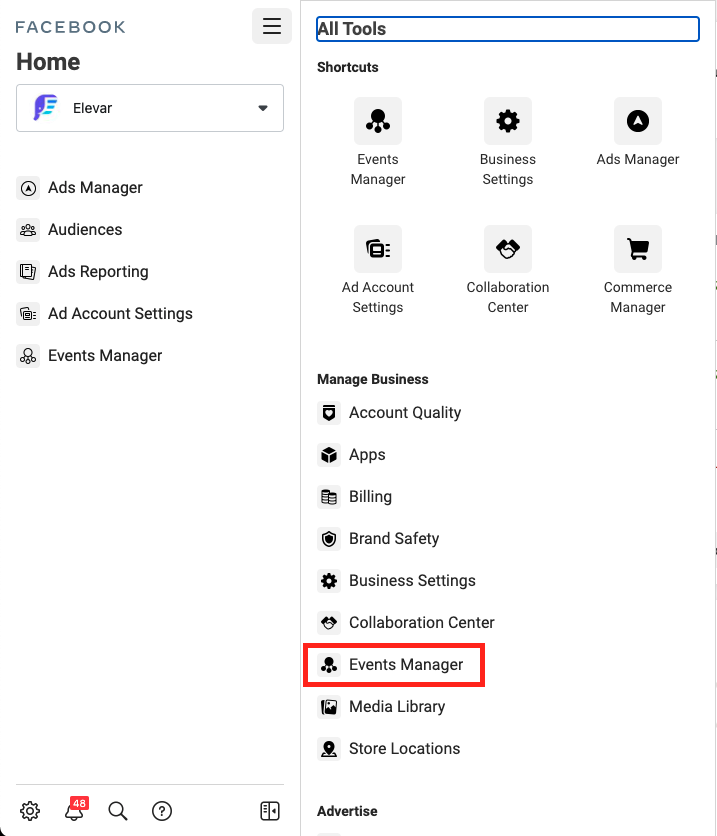
- From All Tools, open Events Manager.
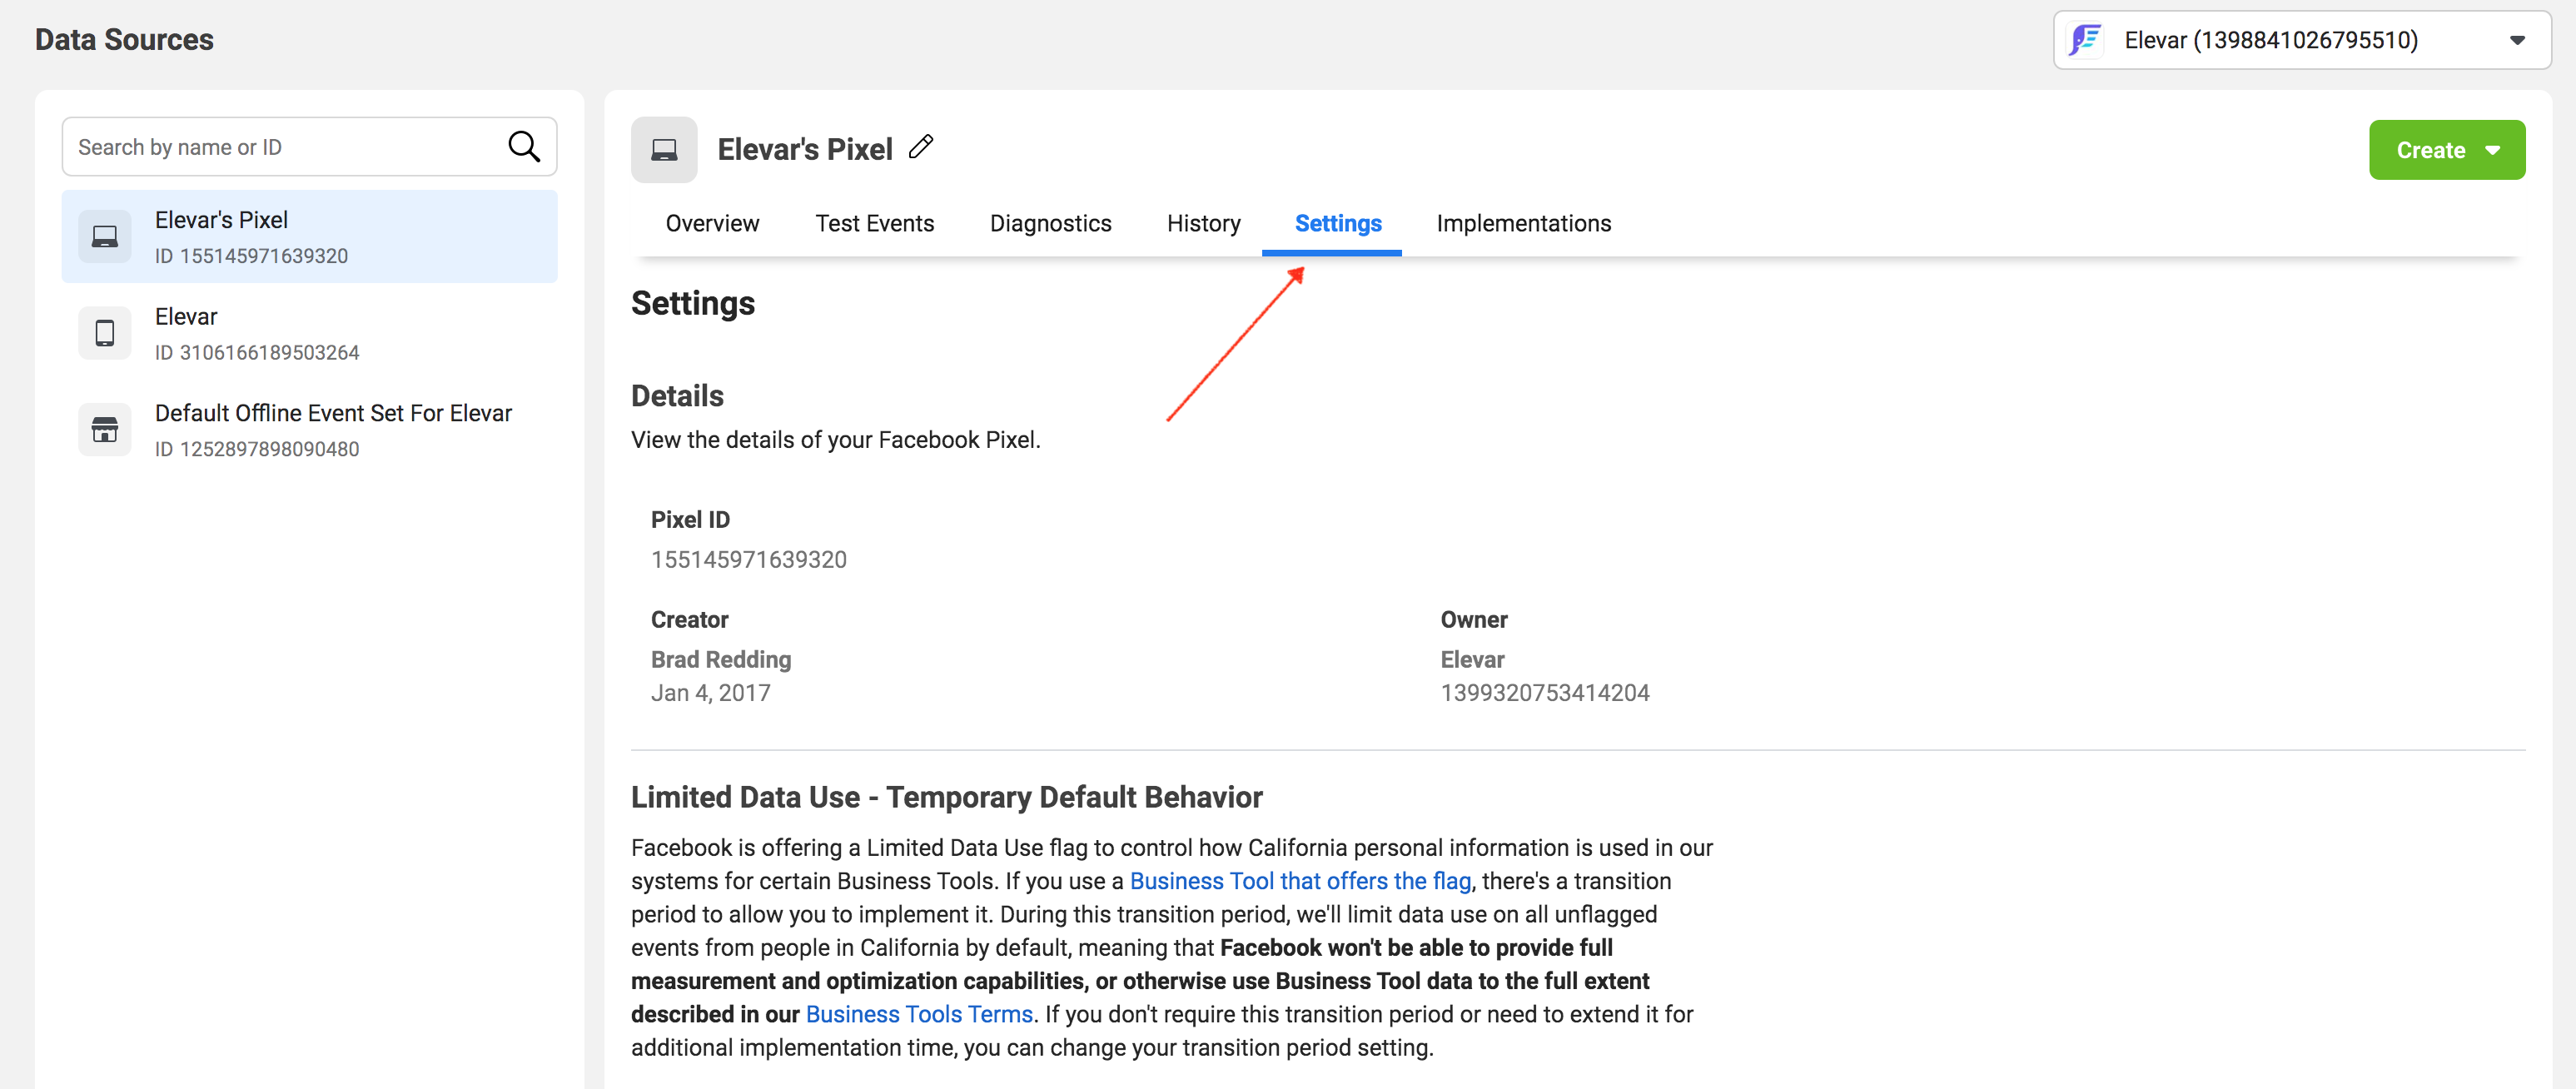
- Open Data Sources and select your Pixel (Meta may label this as a Dataset).
- Open the Settings tab.
- Copy the Dataset ID / Pixel ID (long numeric ID).
Step 2: Generate a Conversions API access token (SonoTrix add-on)
Required only for the SonoTrix add-on (not for the built-in browser-only add-on).
- Stay on the same Pixel Settings tab.
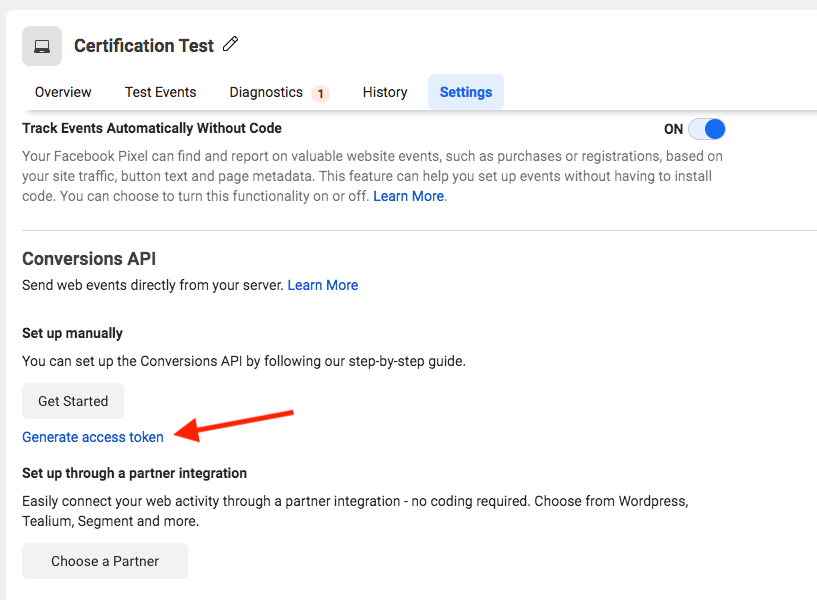
- Scroll to the Conversions API section.
- Prefer Set up manually, then click Generate access token.
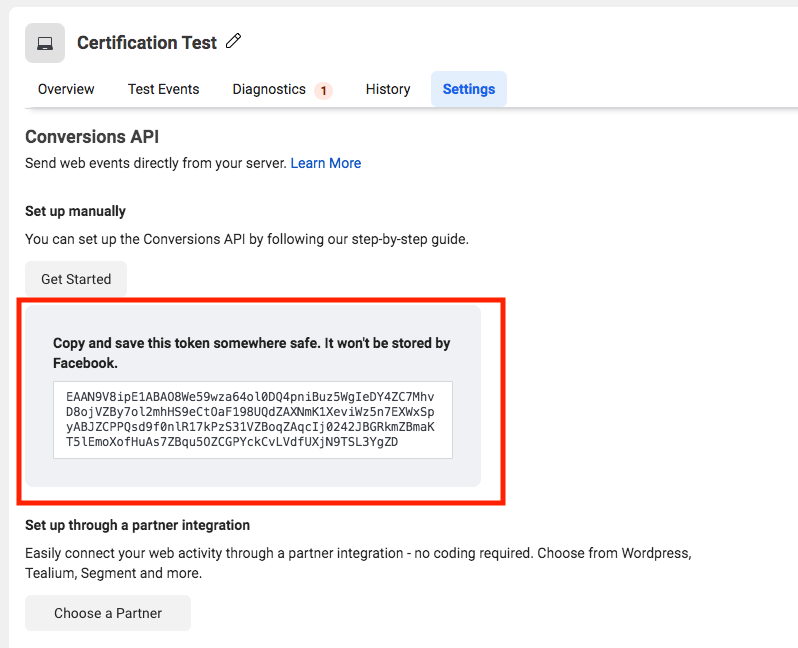
- Copy the token immediately and store it securely (you may not see it again).
You need admin / developer privileges on the business for the generate link to appear.
Step 3 (optional): Test Event Code
- In Events Manager open the Test Events tab for your Pixel.
- Copy the Test Event Code.
- Use it only while testing. Leave it empty for live traffic.
Part B — SonoTrix add-on (recommended)
Install
Option 1 — SonoTrix Add-ons Manager (recommended)
- Open SonoTrix Add-ons in the admin panel.
- Click Refresh Addons.
- Install / upgrade Facebook Pixel And conversion API to the latest version (currently 1.1.6).
- Clear CS-Cart cache after upgrade.
Option 2 — Manual package
- Download the Facebook Pixel And conversion API package from SonoTrix.
- In CS-Cart admin go to Add-ons → Manage add-ons.
- Upload and install the package.
- Enable the add-on when installation finishes.
Then disable the built-in Facebook Pixel add-on if it is active.
See also: How to Install CS-Cart Add-ons and Addon Manager.
Pixel Credentials
Go to Add-ons → Manage add-ons → Facebook Pixel And conversion API → Settings.
- Paste Pixel id.
- Paste Access Token.
- Save.
Pixel Events (browser)
Enable the browser events you want, for example:
- PageView
- View content
- View category
- Add to cart
- Add to wishlist
- Complete registration
- Search
- Initiate checkout
- Purchase
Conversion API Events (server)
Enable matching server events (same names as above). For most stores, start with:
- View content
- Add to cart
- Initiate checkout
- Purchase
Turn on more server events as needed. Browser and server toggles are independent — enable both for the same event when you want Meta to deduplicate them.
Test Events
- Turn on Enable Test Mode while validating.
- Paste Test Event Code.
- Open a private/incognito window, visit a product, add to cart, open checkout, and (optionally) place a test order.
- Confirm events in Meta Test Events.
- Disable test mode and clear the test code for production.
How to read Test Events (deduplication)
When browser + Conversions API use the same Event ID:
| Status in Test Events | Meaning |
|---|---|
| Browser → Processed | Kept as the primary browser hit |
| Server → Deduplicated | Matched to the browser event — this is success, not an error |
You should see matching Event IDs, for example:
viewcontent_…addtocart_…cart_…(InitiateCheckout)- order id for Purchase
If Meta shows two Browser rows with the same Event ID, check browser extensions (Pixel Helper / other Meta tools). The add-on injects one Pixel snippet and one track call per event when configured correctly.
Catalog / product content IDs (v1.1.6+)
From 1.1.6, product events send Meta content_ids using the CS-Cart product code (SKU) when available, with fallback to numeric product_id.
- Example:
content_ids: ["B00F3IUN27"]instead of["244"] - Align your Meta Commerce catalog retailer ID with the same SKU / product code values to avoid “content IDs are not matching any catalogs” diagnostics
Click ID (fbclid / fbc) (v1.1.6+)
The add-on captures fbclid from ad landing URLs, stores it in session / _fbc cookie, and sends a Meta-compliant fbc value on Conversions API events:
fb.1.{creation_time_ms}.{original_fbclid}
The original fbclid is not lowercased, truncated, or rewritten. Invalid values are omitted rather than sent incorrectly.
Storefronts Pixels (Ultimate / multi-storefront)
For each storefront choose:
- Disabled — no pixel for that storefront
- Default — use the main credentials above
- Custom — enter a different Pixel ID and Access Token for that storefront
Verify (SonoTrix)
- Open the storefront in a private window and visit a product, add to cart, and checkout.
- In Events Manager → Test Events, confirm:
- Browser and server events arrive for enabled events
- Same Event ID on browser + server (server may show Deduplicated)
content_idsuse product SKU / product code- Server
user_data.fbckeeps the original click ID format when the visit came from a Meta ad (?fbclid=…)
- After go-live, clear the test code and watch Overview / Diagnostics for Event Match Quality improvements.
Cloudflare / security notes
Conversions API is sent outbound from your store server to graph.facebook.com (no Meta IP allowlist is required on Cloudflare for CAPI).
If Cloudflare Under Attack Mode is enabled temporarily, it can challenge same-origin AJAX used by the storefront (including add-to-cart). Prefer keeping Under Attack Mode off when there is no active attack, and use targeted WAF / Cloudflare Turnstile on forms instead.
If your host must keep challenges on, allow same-origin POST to:
index.php?dispatch=srx_fb_meta_pixel.events
and normal CS-Cart AJAX add-to-cart requests.
Part C — Built-in CS-Cart Facebook Pixel (browser only)
Use this only if you need a simple Pixel ID with no Conversions API. For CAPI, test mode, or multi-storefront pixels, use Part B instead and disable this add-on.
Install / enable
- In CS-Cart admin go to Add-ons → Manage add-ons.
- Find Facebook Pixel (supplier: CS-Cart).
- Install if needed, then set status to Active.
Settings
Go to Add-ons → Manage add-ons → Facebook Pixel → Settings → General.
- Paste Facebook Pixel Identifier (same Pixel ID from Part A, Step 1).
- Enable the tracking options you need:
- Track all page views
- Track adding product to cart
- Track placing order
- Save.
No Access Token is required for this built-in add-on.
Verify (built-in)
- Install Meta Pixel Helper (or similar).
- Visit the storefront and confirm the Pixel ID fires on page view / cart / purchase as enabled.
- Confirm the same events in Events Manager Overview.
Changelog
1.1.6
- Meta click ID (
fbclid→fbc) capture and Conversions API pass-through in Meta’s expected format (no modified fbclid) - Product
content_ids/contents[].iduse CS-Cart product code (SKU) for catalog matching (fallback toproduct_id) - Browser ↔ server event ID deduplication improved (ViewContent and AJAX Add to cart / wishlist)
- Safer license / expiry handling (soft-disable tracking instead of breaking the storefront on early bootstrap)
- Conversions API payload quality:
event_source_url, normalized email/phone hashing before SHA-256 - Pixel ID handled as string (large Meta Dataset IDs)
1.1.5
- Shared schema / storefront pixels table safety improvements
- Upgrade helpers for storefront pixel settings
1.1.4
- Vivashop theme compatibility for browser Add to cart tracking
1.1.3
- Installation / upgrade path fixes